Dive into the Blueprint: Crafting Your Dream Deck Design
Alright, let’s get into the fun part—designing your deck! This is where you let those creative juices flow and really think about how you want your summer oasis to look. I mean, who doesn’t want a spot that’s not just functional but also looks like it jumped out of a Pinterest board, right?
First off, you gotta consider the layout. Think about how you plan to use this space. Are you more of a sunbather, or do you envision lively BBQ parties with friends and family? Maybe you just want a cozy nook to sip your morning coffee while watching the sunrise. Whatever your vibe, sketch it out! It doesn’t have to be perfect—just get your ideas on paper.
- Size Matters: Make sure your deck isn’t too cramped. You want enough space for furniture and, ya know, people! If it’s too small, you might end up doing the awkward shuffle dance at your next gathering.
- Shape it Up: Rectangular decks are classic, but have you ever thought about a curved design? It can really add some flair. Just don’t blame me if you end up with a deck that looks like a giant banana!
- Flow is Key: Think about how you’ll move around. You don’t want to be dodging tables and chairs like it’s an obstacle course. Keep pathways clear, and make sure there’s a logical flow from the pool to the deck and any other areas.
Next up, materials. This part can get a bit overwhelming since there’s so much out there. Wood, composite, PVC—oh my! Each has its pros and cons. Personally, I love the look of natural wood, but let’s be real, it needs some love to keep it looking good. If you’re not up for constant maintenance, maybe go for composite. It’s like the lazy person’s best friend—looks good without too much fuss.
Lastly, don’t forget the finishing touches. Plan for lighting, railings, and maybe even some built-in seating. These little details can make a huge difference. And hey, if you’re feeling adventurous, throw in a fire pit. Who wouldn’t want to roast marshmallows under the stars?
So, grab that pencil and paper and start sketching! Your dream deck is just a little creativity away. Happy designing!
Tools of the Trade: Arm Yourself for the Build
Alright, let’s get into the nitty-gritty of what you’re gonna need to make this pool deck happen! You don’t want to be halfway through your project and realize you’re missing a crucial tool. Trust me, that’s a quick way to turn a sunny day into a frustrating mess. So, grab a snack, get comfy, and let’s talk tools!
- Measuring Tape: Seriously, this is your best friend. A good measuring tape will help you make sure everything fits just right. I can’t tell you how many times I’ve eyeballed something and ended up with a crooked deck. Not cool.
- Level: No one wants a wobbly deck. A level helps ensure your framing is straight and true. It’s like having a little angel on your shoulder telling you, “Hey, fix that!”
- Power Drill: You’ll be doing a lot of screwing (and no, not that kind). A power drill makes the job way easier. Plus, it’s super satisfying to see those screws go in smoothly. Just be careful not to get too carried away and drill through your foot. Yikes!
- Circular Saw: For cutting lumber, a circular saw is a must-have. It’ll save you so much time compared to a hand saw. Just remember to wear safety goggles; you don’t want sawdust in your eyes while you’re trying to build your masterpiece.
- Hammer: Old school, but still effective. A good hammer is handy for those moments when your drill decides to take a break. Plus, it’s great for getting out any frustration. Just don’t go overboard, or you might end up with a dented board.
- Safety Gear: Don’t forget your gloves and goggles! It might not be the coolest look, but safety first, right? You wanna be able to enjoy your pool deck and not be nursing any injuries.
And hey, if you wanna throw in some extra tools like a jigsaw or a miter saw, go for it! The more, the merrier. Just make sure you know how to use them safely. Building a pool deck should be fun, not a trip to the ER!
So, there you have it! Arm yourself with these tools, and you’ll be well on your way to creating a deck that’ll make your neighbors jealous. Just remember: measure twice, cut once, and maybe crank up some tunes while you’re at it. Happy building!
Framing the Fun: Step-by-Step Construction Magic
Alright, so you’ve got your above ground pool set up, and now it’s time to build that fabulous deck that’ll make your backyard the envy of the neighborhood. Framing might sound like a drag, but trust me, it’s where the magic happens! Let’s dive in, shall we?
First things first, gather your materials. You’ll need pressure-treated lumber (it’s like the superhero of wood), screws, brackets, and maybe a few extra snacks to keep your energy up. And don’t forget your trusty tools: a saw, drill, measuring tape, and a level. Seriously, a level is key—no one wants a lopsided deck unless you’re going for that “surreal art” vibe.
Now, let’s get to the nitty-gritty. Start by laying out the perimeter of your deck. It’s like creating a giant frame for your summer masterpiece. Use stakes and string to outline the area, ensuring you’ve got enough space for lounging, BBQing, or whatever summer shenanigans you have in mind.
- Measure Twice, Cut Once: This old saying isn’t just for the sake of it. Measure carefully to avoid any awkward moments of “uh-oh, that’s too short.”
- Build the Frame: Start with the outer frame using your pressure-treated lumber. Make sure it’s square—this is where the level comes in handy. Trust me, no one wants a deck that looks like it’s been through an earthquake!
- Add Support Beams: Depending on the size of your deck, you’ll want to add some support beams. Think of them like the backbone of your deck. They’ll keep everything sturdy, allowing you to jump in and out of the pool without worry.
Once the frame is up, it’s time to add the decking boards. Lay those bad boys down, leaving a small gap between each board for drainage. We want to avoid a slip-and-slide situation when it rains, right? Use screws to secure them down, and don’t skimp on the fasteners—nobody wants a board popping up when you’re trying to show off your cannonball skills.
Finally, give everything a good once-over. Check for any sharp edges or uneven spots, because let’s be real, summer fun should be about splashes, not scrapes! And voilà, you’re done! Well, almost. Once you’ve got your deck built, it’s time to decorate and make it your own.
Framing your above ground pool deck doesn’t have to be a chore. It can actually be a fun project that adds character to your space. Plus, you can always sweet-talk a friend into helping you out. Just promise them pizza and cold drinks for their hard work, and you’re golden!
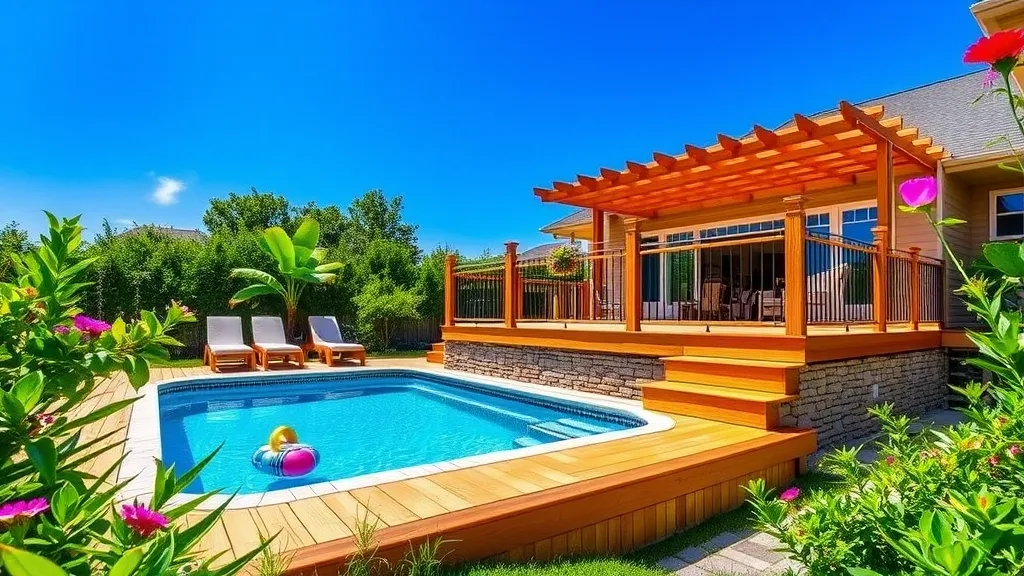
Finishing Touches: Elevate Your Oasis with Style
So, you’ve built your above ground pool deck, and it looks pretty darn good, if I say so myself. But wait! Before you dive in and start splashing around, let’s talk about those finishing touches that can really amp up your summer oasis. It’s like putting the cherry on top of a sundae—you don’t need it, but wow, does it make a difference!
- Furniture: First off, consider adding some comfy seating. A couple of loungers or a cute little bistro set can really transform your space. I mean, who doesn’t love sipping iced tea while soaking up the sun? Plus, it’s a great spot for those awkward family conversations that always seem to happen at pool parties.
- Lighting: Now, let’s talk lighting. String lights are like the fairy dust of outdoor spaces. They create this magical ambiance, especially in the evenings. You could go for lanterns or even some solar-powered lights if you’re feeling eco-friendly. Just imagine the vibe—soft lighting, a gentle breeze, and maybe some music playing in the background. Ahh, bliss!
- Landscaping: Don’t forget about the landscape! Adding some plants or flowers can really tie everything together. Think about that tropical feel—palm trees, colorful blooms, or even some decorative rocks. Just keep it low maintenance unless you wanna add ‘gardener’ to your list of summer activities. Trust me, nobody wants to spend their days weeding when they could be lounging by the pool.
- Accessories: And hey, accessories matter! Throw in some fun pool floats (I mean, who doesn’t love a giant unicorn?), towels, and maybe a little outdoor rug. These little details can really reflect your personality and make the space feel like yours. Plus, it gives your neighbors something to talk about. “Did you see their floaties? So extra!”
Finally, don’t underestimate the power of a good umbrella or shade structure. Nobody wants to bake under the sun all day, right? A little shade can make your oasis a comfortable hangout for everyone, especially the kiddos or your Aunt Linda who always forgets the sunscreen.
So there you have it—some simple ways to elevate your pool deck from “just okay” to “wow, I can’t believe I get to hang out here!” Enjoy the sun, the splashes, and all the good vibes. Your summer oasis is calling!
Leave a Reply